

Did you know that businesses using Page Designer experience an average increase of 30% in conversion rates? Salesforce Commerce Cloud Page Designer is a powerful tool that allows businesses to create and manage custom pages for their storefronts. It is a visual editor that uses drag-and-drop functionality to make it easy to create pages. Page Designer also supports reusable page types and component types, which can save businesses time and effort.
- It was first released in 2016.
- Fortune 500 companies and businesses of all sizes use it.
- It is available in over 100 languages.
- It is constantly being updated with new features and functionality.
Page Designers is a content management system (CMS) to help users create and manage web pages. Page Designers is there to help you reduce developer dependency, improve market speed, and significantly lower speed and assurance time.
What is Salesforce Commerce Cloud page designer?
Page Designer is a feature of Salesforce Commerce Cloud that allows you to create and manage pages in a visual editor. It is a powerful tool that can be used to create custom pages for your storefront. Page Designer includes a variety of features, such as
SFCC provides us with a range of pre-designed PD components to make it easier for users to get started.
Users can add various components, such as images, text, videos, and forms, with different layouts. They can also customise these components’ colours, fonts, and styles without requiring extensive technical knowledge or coding skills.
Key features of the Salesforce Commerce Cloud page designer
- Drag-and-Drop Interface: Commerce Cloud Page Designer’s drag-and-drop functionality allows users to place and arrange page elements effortlessly, saving time and effort.
- Component Library: The tool provides a comprehensive library of pre-built components, including banners, product grids, and forms, enabling users to create dynamic and engaging pages.
- Responsive Design: Commerce Cloud Page Designer ensures that your pages are optimised for different devices and screen sizes, providing a seamless shopping experience for your customers.
- Real-Time Preview: Users can preview their page designs in real-time, making it easy to visualise and refine the layout before publishing.
- Version Control: Commerce Cloud Page Designer offers version control functionality, allowing users to track and revert changes if needed.
- Create and edit content pages quickly without relying on developers.
- One-time development of reusable templates and assets
- Easy-to-use visual page editor. Simplified image upload and selection
Advanced features of the page designer
Page Designer includes several advanced features, such as
- Dynamic pages: Dynamic pages change their content based on certain criteria. For example, you could create a dynamic page that displays a different product list for each category.
- Reusable components: Reusable components can be used on multiple pages. When creating pages, this can save time and effort.
- Page templates: Page templates are pre-built pages that you can use as a starting point for creating your pages. This can help you get started quickly and easily.
Why choose Salesforce Commerce Cloud page designer?
- Efficiency and Time Savings: By eliminating coding, Commerce Cloud Page Designer enables businesses to design and update their pages quickly and easily, saving valuable time and resources.
- User-Friendly Interface: The intuitive interface of Commerce Cloud Page Designer makes it accessible to users of all technical backgrounds, allowing them to create visually appealing pages without hassle.
- Flexibility and Customization: With a wide range of pre-built components and templates, Commerce Cloud Page Designer allows businesses to customise their storefronts according to their brand identity and customer preferences.
- Seamless Integration: Commerce Cloud Page Designer seamlessly integrates with Salesforce Commerce Cloud, ensuring a smooth and cohesive e-commerce ecosystem.
- It is a visual editor, making creating custom pages easy.
- It includes features for creating dynamic pages, reusable components, and page templates.
- It offers simplicity in its usage, catering to both technical and non-technical users alike.
- It is a powerful tool that can be used to create various custom pages for your storefront.
Anatomy of a Salesforce page designer
When discussing the structure of the page designer, three key terms come to the forefront: page type, layout, and component. These are also the core of the PD concept and logic.
Page type: This is where we create the design for our different page types. This is where you establish the primary objective of the page.
Layouts and regions: act as containers where you can nest your content and assets, providing the opportunity for reusability.
Assets/Components: Pieces of content made to be as modular as possible so they can represent their use in the best possible way in the closed-up segment (product tile, grid tile, layout element).

Steps to create the page designer storefront
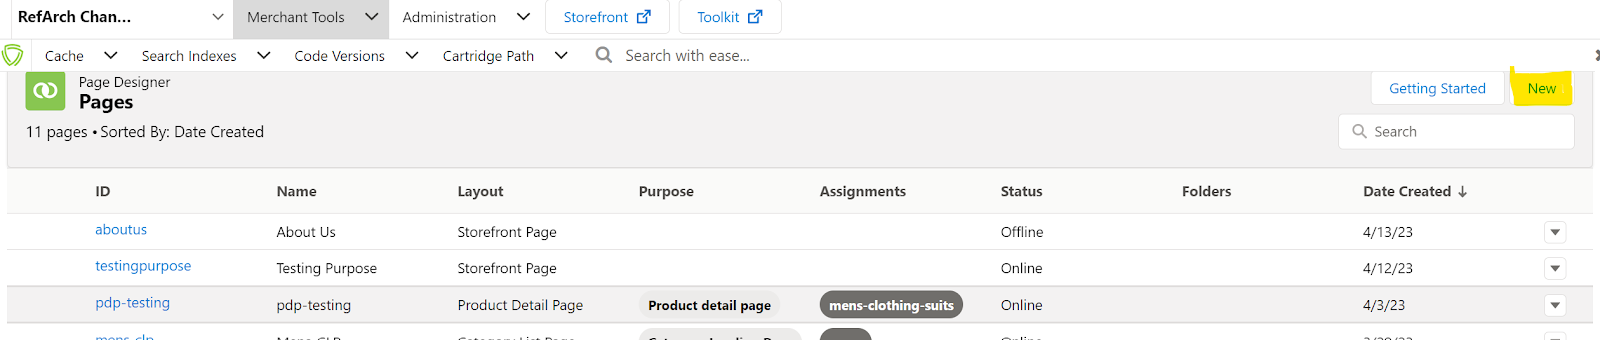
- To access the “Merchant Tools,” please log in to your “Business Manager” account and proceed with clicking on the respective option.

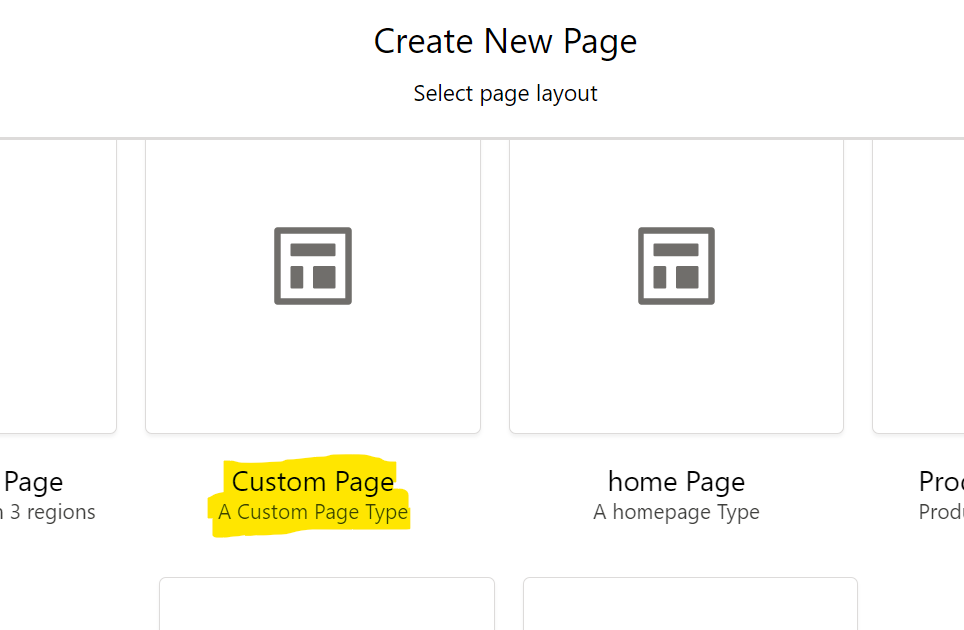
- Once we click on the Page Designer, we will get the page designer window where we need to click on the “New” button on the top right.
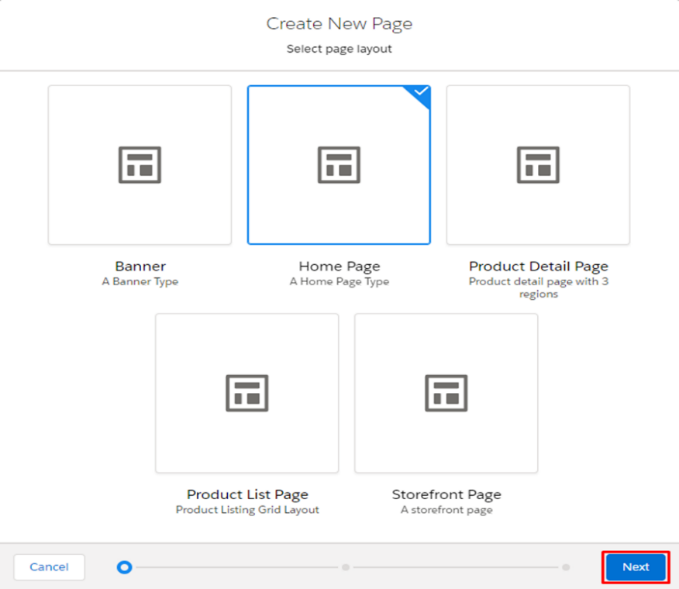
- Choose the ‘Home Page’ layout or any layout as per your requirements in the opened modal window and click ‘Next.’
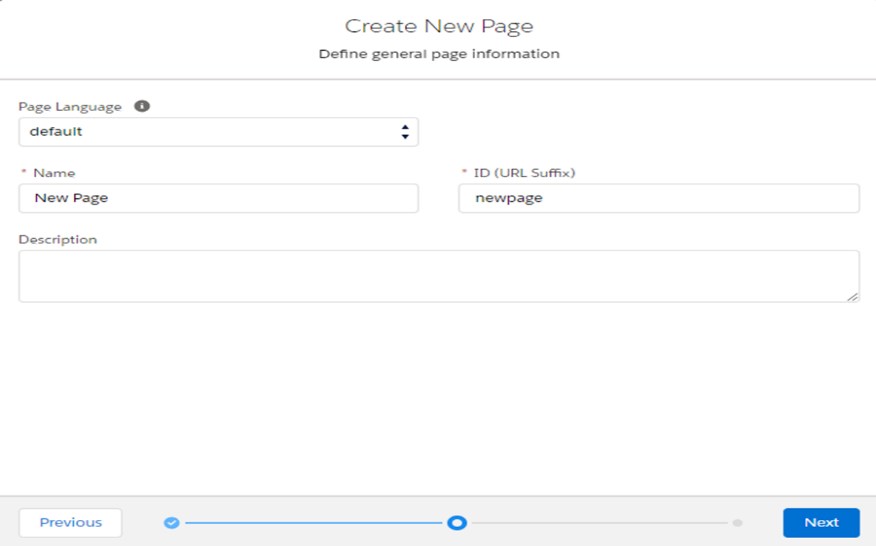
- In the next step, specify ‘Name’ and ‘ID (URL Suffix)’ for the new page. After that, click ‘Next’.
- Review all the data entered in the last step and click “Save and Create” to complete page creation. After that, a new empty page will be created and opened in edit mode.

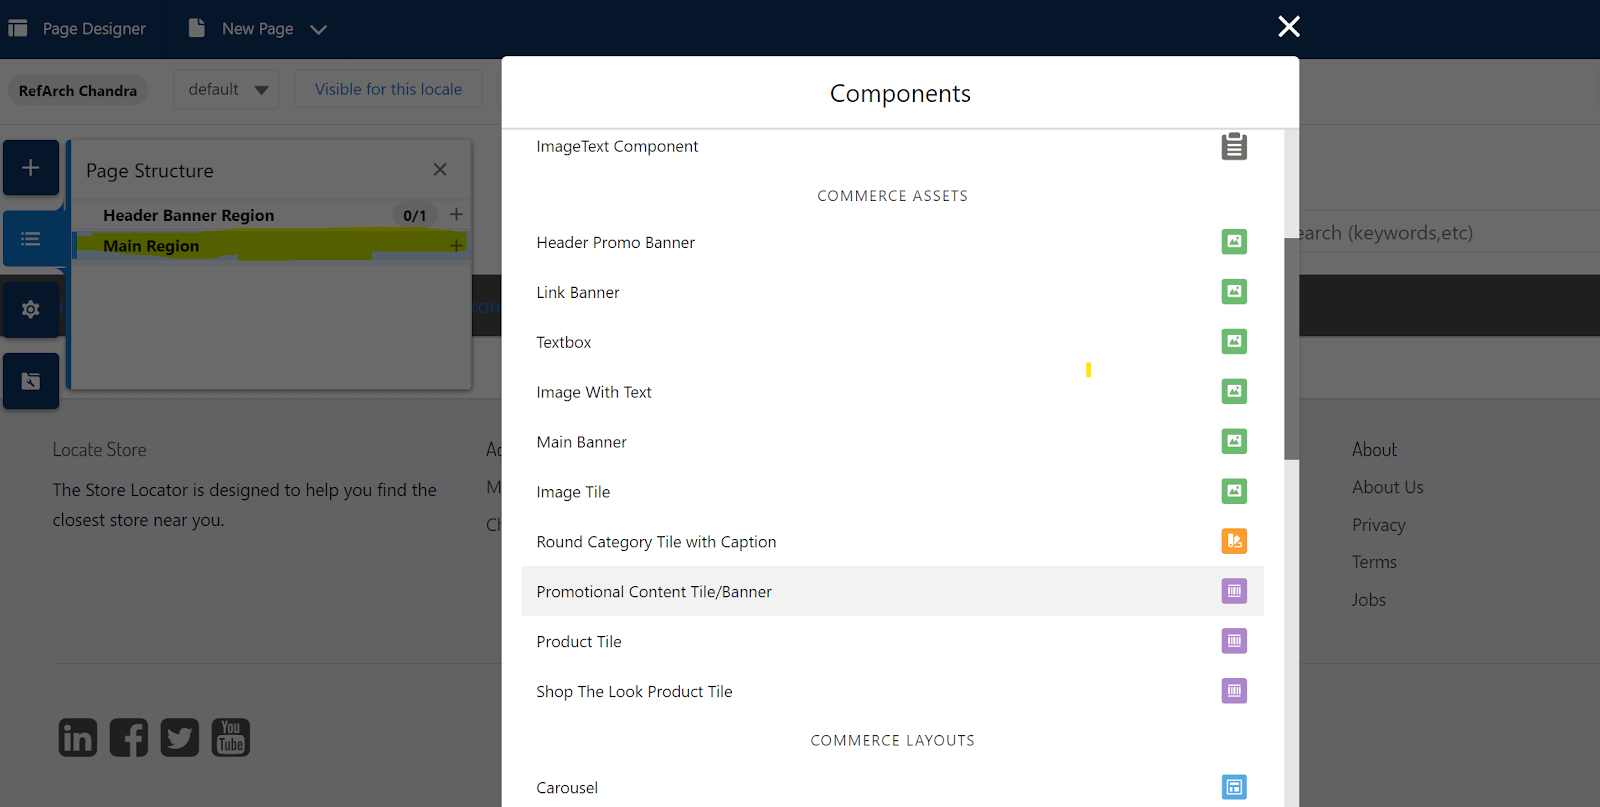
- Select the components needed to add to the page by clicking on the plus symbol. A model containing all the components will be available.
- After adding all the components required to make the page available on the storefront, click the “Publish” button in the top right corner of the editor.

- To open a newly created page, use the following pattern: “https://development-eu01-……………………………Page-Show?cid=PAGE_ID”, and replace “PAGE_ID” with the ID of your page.
Files that you may need to modify in order to customise the page designer
- Page and asset templates: These are the files that define the overall structure of the pages, such as the header, footer, and main content area. In SFRA, these files are typically located on the page: “/cartridges/app_storefront_base/cartridge/templates/default/experience/pages”
- Components:”/cartridges/app_storefront_base/cartridge/templates/default/experience/components.”directory.
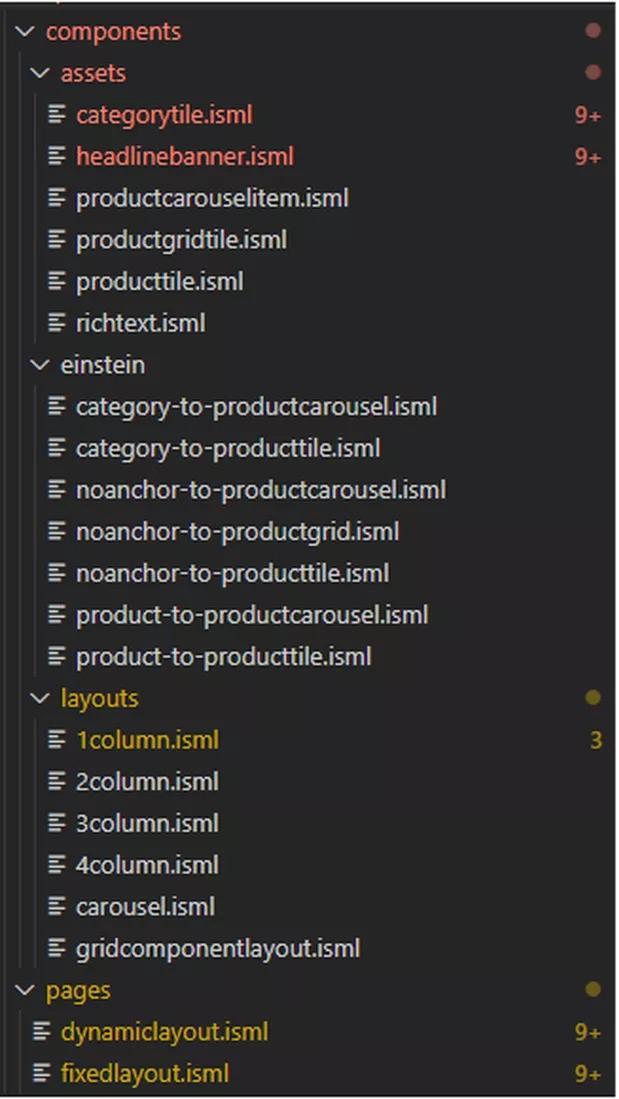
- Page designer properties files: These cartridges contain the page designer JS and JSON files. These are used to render the logic and contain key-value pairs that specify things like the colour scheme, font sizes, and other styling information in SFRA, and these files are typically located in the “/cartridges/app_storefront_base/cartridge/experience” directory.

CSS and JavaScript files: These files define the styling and behaviour of the page designer components. In SFRA, these files are typically located in the “/cartridges/app_storefront_base_pd/cartridge/client/default/scss/experience” and “/cartridges/app_storefront_base_pd/cartridge/client/default/js/experience” directories.
Creating a custom page
- We need to create a template for our custom page: customPage.isml.
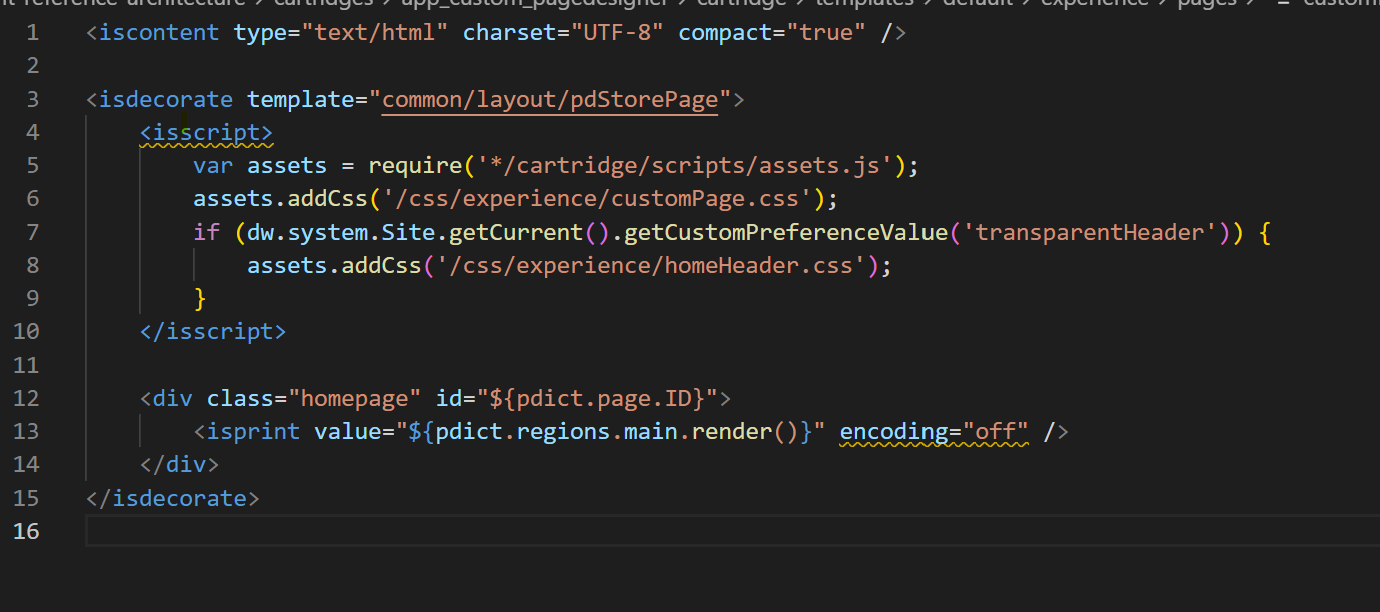
- We need attributes for our custom page: customPage.json.

The term “component_type_exclusions” typically refers to components that cannot be used or included in the system.
The term “max_components” typically refers to the maximum number of components that can be added In the region.
“component_type_exclusions” typically refers to components that cannot be used or included in the system.
“max_components” typically refers to the maximum number of components that can be added in the region.
4. Now we will finally add the script file, which helps to render the page: customPage.js.

When we are done with creating a ‘CustomPage’, we will be able to see the page in our business manager: Merchant Tools, Content, Page Designer.
Differences between the page designer and content assets and slots
The page designer is primarily used to create and manage the layout and content of storefront pages. Users can add and rearrange various components, such as images, text, products, and promotions, using the straightforward user interface that is provided.
On the other hand, content assets or slots are used to manage the content displayed in specific website areas, such as the header, footer, or sidebar. Content assets are reusable content that can be added to these slots, such as images, banners, or text snippets.
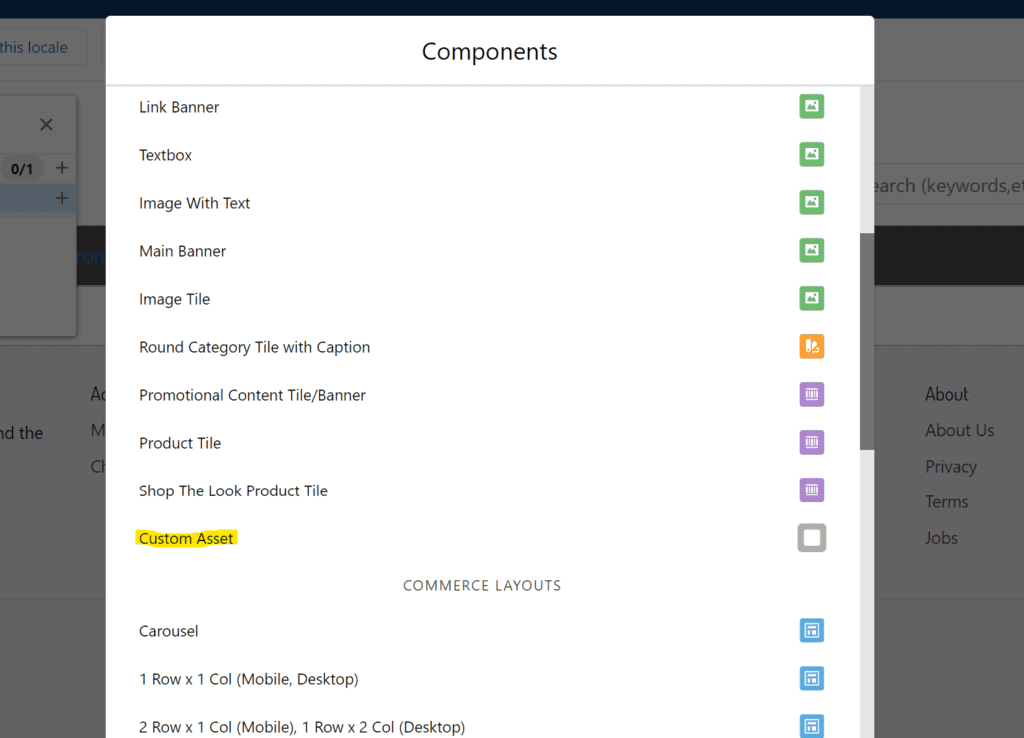
Creating a custom asset
- We need to create a template for our custom asset: customAsset.isml.

- We need attributes for our custom page: customAsset.json
The term “type” in the screenshot below refers to the component attribute type we will get from the merchandise to display in the storefront.

There are many other types of attributes which are listed below
| Component Attribute Type | Attribute Semantics | Visual Editor UI Control |
|---|---|---|
| boolean | Boolean | Check box |
| category | A string representing a catalogue category ID | Category picker |
| cms_record | Record from the Salesforce CMS (Content Management System) | The user is presented with a modal window to select the CMS record. After the user selects the CMS record, the edit panel displays the UI controls necessary to configure the attributes of the selected CMS record. |
| custom | A string enclosed in curly brackets {} that represents a JSON object | Text area or custom UI control |
| enum | Enumeration of either string or integer values. | Select box (single select) |
| file | String representing a file path within a library | File picker |
| image | String representing a configurable image JSON | Image picker that lets users select an image and specify a focal point on that image. The image dimensions are also stored and can be accessed, along with the image name and focal point, using the Image API |
| integer | Integer | Input field |
| markup | String representing HTML markup | A rich text editor that allows semantic formatting options to produce HTML markup |
| page | String representing a page ID | Page picker |
| product | String representing a product SKU | Product picker |
| string | String | Input field |
| text | String | Text area |
| url | String representing a URL | URL picker |
- Now we will finally add the script file that helps render the asset: customAsset.js
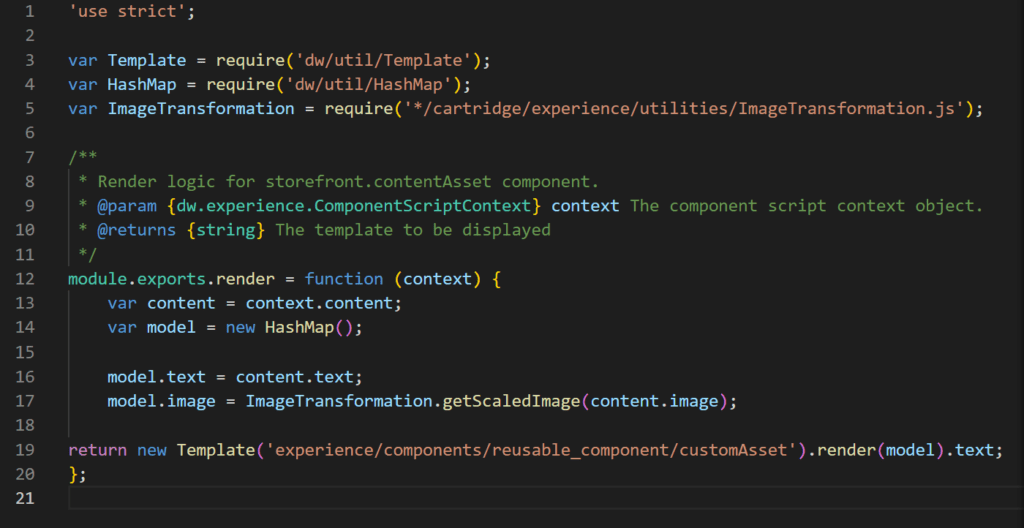
When we are done with creating a ‘CustomAsset’ we will be able to see the component in our list of components available in the list.
Notes:
- Page Designer has the disadvantage that we can’t check for any errors related to the components.
- So, while creating the components, we have to be very careful. Still, if we face any issue with rendering the component, here are some ways to find out which file is having the issue, because of which you cannot render the component.
- If you cannot see the component or face an issue while saving the component already used on the page, we need to refer to the .json file of the particular component.
- If you are facing an issue where your component in the page structure is not in dark colour, as shown below, please consider this an issue in the.js file of the component.
What are the benefits of a page designer?
Here are some of the benefits of using page designer:
- Increased flexibility: Page Designer allows you to create custom pages that meet your needs.
- Reduced development time: Page Designer can help you reduce development time by allowing you to create pages visually.
- Improved user experience: Page Designer can help you improve the user experience of your storefront by allowing you to create visually appealing and easy pages.
- Increased SEO: Page Designer can help you improve your SEO by allowing you to create optimised pages for search engines.
Conclusion
Page Designer is a powerful tool that can be used to create and manage pages in Salesforce Commerce Cloud. It is a visual editor that allows you to create custom pages by dragging and dropping components. Page Designer also includes features for creating dynamic pages, reusable components, and page templates.
FAQs
What are the different types of pages that can be created with Page Designer?
There are a variety of different types of pages that can be created with Page Designer, including:
- Product pages: Product pages display information about a specific product.
- Category pages: These pages display a list of products in a particular category.
- The homepage is the primary page of your storefront.
- Checkout pages: Checkout pages are pages where customers can enter their shipping and payment information to complete a purchase.
- Other pages: Page Designer can also be used to create other types of pages, such as blog pages, contact pages, and FAQ pages.
What is a page designer in Salesforce?
Page Designer is a B2C Commerce feature that allows merchants to create and manage custom pages in the storefront without the need for a developer. Merchants can use a visual editor in Business Manager to drag and drop pages and component types to create custom pages.
Page Designer includes a variety of features that make it easy to create custom pages, including
- A library of reusable page and component types
- A visual editor that makes it easy to drag and drop page and component types
- The ability to schedule and publish custom pages
- The ability to preview custom pages before publishing them
Page Designer is a powerful tool that can help merchants create custom pages that meet their specific needs. It is a valuable addition to the Salesforce Commerce Cloud platform.